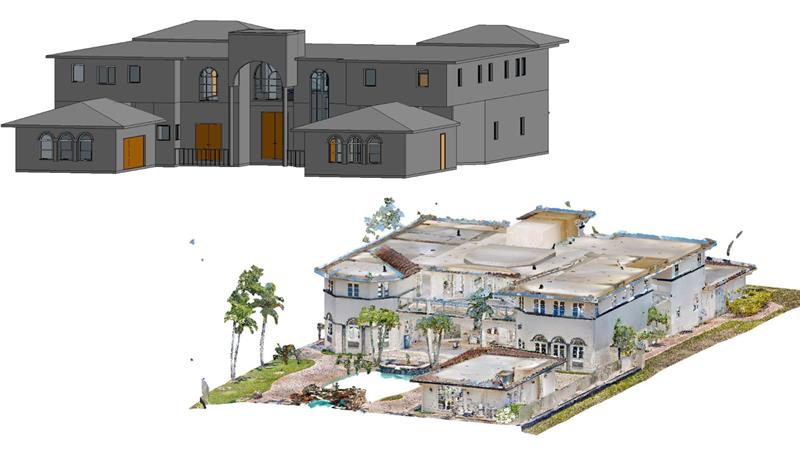
Scan to BIM, at its core, is the process of transforming any laser-scanned point cloud data into detailed, information-rich BIM models. Think of it as giving buildings and spaces of the real world, a digital twin in the virtual realm – with sharper memory, more information and less guesswork. From renovation to retrofitting, restoration to facility management, this workflow replaces outdated manual documentation with a process that is so advanced, precise and quicker. But even with cutting-edge scanners, many can get stuck with noisy data, messy interpretations and inconsistent model outputs can derail the whole process.
In today’s fast-paced AEC world, the cost of any error is steep. Scan to BIM best practices help teams plan smarter retrofits, spot clashes before they are executed on-site and collaborate without confusion. Say goodbye to outdated drawings and hello to models that actually reflect the building. With improved BIM integration, spatial accuracy and a clear streamlined workflow, construction becomes a little less “hope for the best” and a lot more “we’ve got this.”
Whether you’re starting out or refining your workflow, this guide brings you 10 tested and executed Scan to BIM best practices in construction. Consider it your handy Scan to BIM Best Practices PDF – a direct way to boost accuracy, coordination and confidence in every project.
10 Scan to BIM Best Practices
- Setting a Clear Purpose and Scope
One of the most foundational practices would be establishing well-defined objectives right from the start. Whether the project is for renovation, facility management or just documentation, setting the scope helps all stakeholders align on deliverables, expectations, level of detail and resource planning. Clear intent minimizes reworking and ensures the model supports actual project needs, avoiding unnecessary time delay and costs overruns. Thorough Pre-Scan Planning and Documentation Collection
Effective Scan to BIM execution begins long before the first scan is captured on any gadget on-site. Gathering existing documentation, conducting site assessments and planning scan coverage according to the building’s type, scale, complexity and scope are essential. This actually lays the groundwork for an accurate, comprehensive and efficient data capture for the rest of the workflow. Thorough planning can directly reduce rework, guesswork and errors.Creating Efficient Communication Among Stakeholders
Clear communication amongst all stakeholders, from architects and engineers to surveyors and BIM modelers might be one of the most critical and important practice. Early and efficient coordination ensures aligned expectations regarding deliverables, data format, LOD and more. Regular updates and issue resolution protocols help maintain workflow efficiency, transparency and avoid delays.Partnering with Trusted 3D Laser Scanning Teams
The quality of scanned point cloud data can directly impact the outcome of the BIM model. Collaborating with experienced scanning experts is essential, ones who understand your project-specific requirements and ensure accurate data capture, proper equipment selection and adherence to safety and site protocols. Choosing the right partner reduces any future modeling issues.Integrating Visual Imagery with Point Cloud Data
Incorporating detailed high-quality site photographs or panoramic imagery enhances the interpretability of scanned point cloud data. It helps BIM modelers in identifying materials, textures, spatial relationships and other details, which might have been missed during the scanning process. This integration is a recommended approach in advanced Scan to BIM best practices pdf, especially for architectural and heritage projects.Having a Modular Data Registration and Stitching Strategy
Attempting to register large, complex scan data in a single step increases the risk of misalignment, inaccuracies and reduced data. A modular strategy is organizing scans by spatial zones or floors, helping to maintain precision and manage file sizes effectively. This helps teams have higher levels of quality control and makes the overall project more manageable.Ensuring Efficient and Standardized Revit BIM Modeling Workflows
While converting any point cloud data to a BIM model, an efficient Revit workflow can make or break the overall process. With consistent templates, Revit families, naming standards and modeling protocols, a standardized Revit modeling workflow ensures accuracy and collaboration across teams. These practices support faster model creation and better coordination.Using Level of Detail (LOD) and Object-Based Modeling Strategically
Modeling should be purposeful, not unnecessarily excessive. Following the pre-defined LOD specifications based on the project’s scope ensures the right level of geometry and data at each stage of the project. Further, object-based modeling with parametric families supports efficiency and quicker workflows.Applying Quality Control Measures and Clash Detection
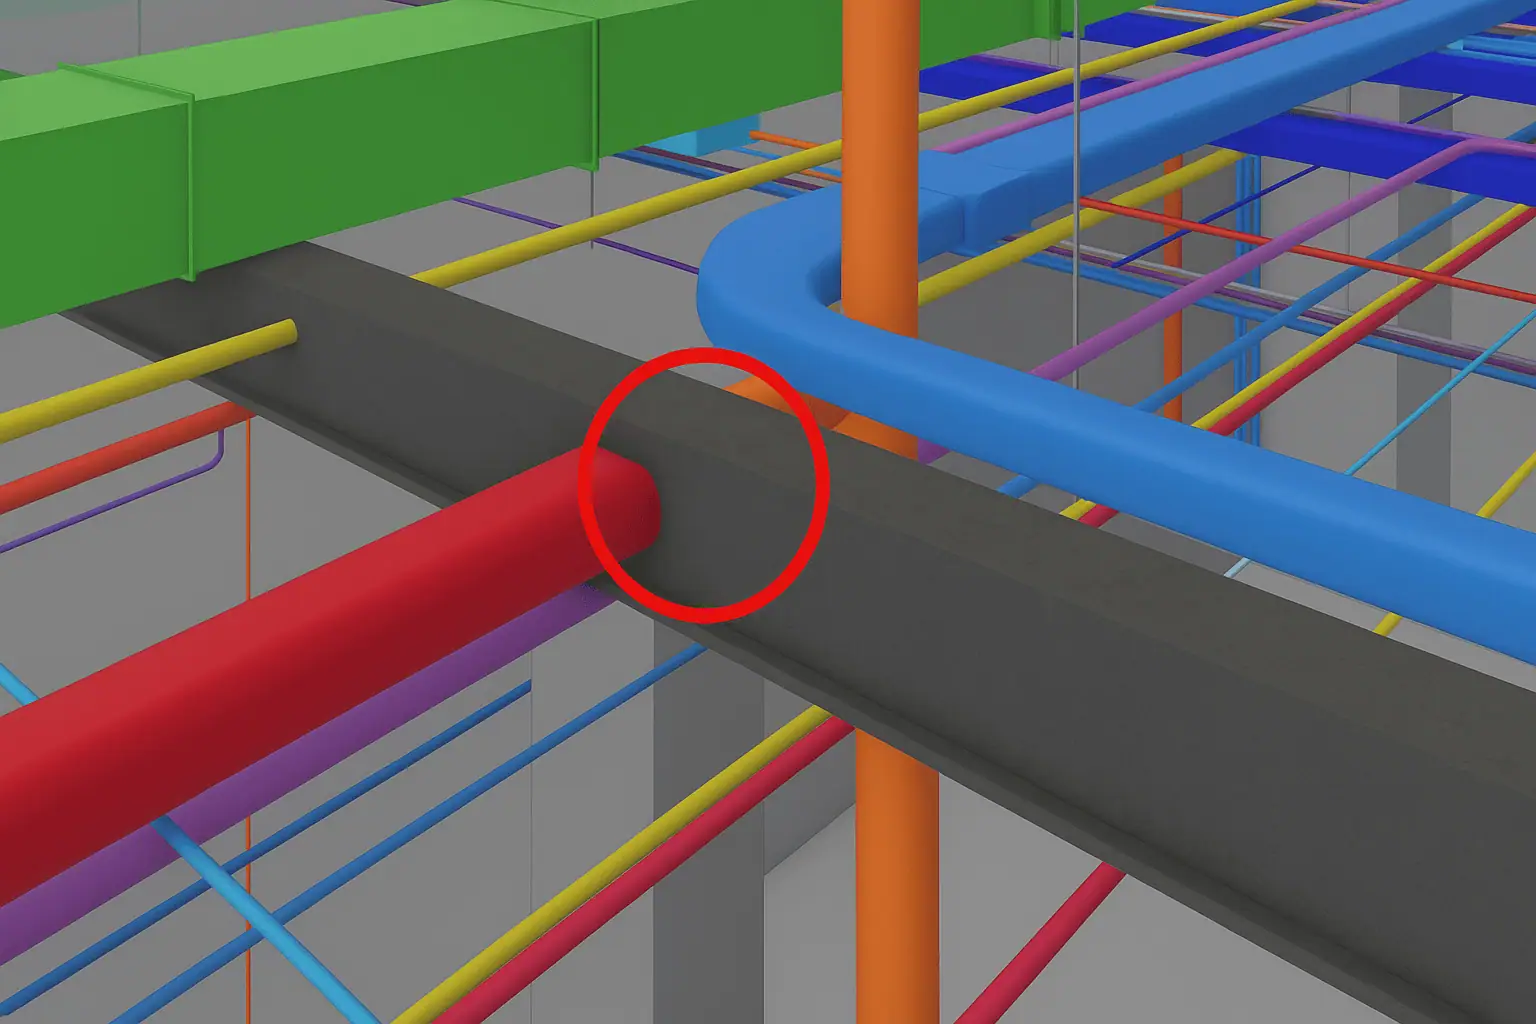
Quality control must be integrated throughout the Scan to BIM workflow. This includes checking point cloud alignment, verifying model accuracy and performing clash detection between any system. Strong QA/QC processes also ensure that final deliverables are industry standards-compliant. With periodic model reviews, a well-integrated quality control might be one of the most critical Scan to BIM best practices in construction.Leveraging Scan to BIM for Lifecycle Asset Management and FM Integration
Beyond construction and design, BIM models created through scanning can serve as long-term assets for facility management of the project. Embedding metadata and ensuring compatibility with FM platforms enables streamlined maintenance, space management and asset tracking throughout the project’s lifecycle. With this practice, the BIM model becomes a living resource beyond construction.
NEXT STEP
Are you ready to turn the scanned chaotic point cloud data into something a little more constructive and tangible?
At Cresire Rendering, we help architects, AEC professionals and facility managers make sense of any raw scan data through precise, structured and standardized Scan to BIM services. Whether it’s for renovation, facility management, or even new construction, we deliver detailed and intelligent BIM models that follow proven Scan to BIM best practices – so your project never misses the mark while matching the current industry’s standards.
Our team ensures accurate registration, efficient modeling workflows and seamless integration of the BIM models. If you’re ready to elevate your modeling workflows and reduce costly surprises, let’s build something smarter together, because in today’s industry, following Scan to BIM best practices in construction isn’t optional. It’s essential.
Let’s transform your scan data into something powerful. Reach out to Cresire Rendering for expert Scan to BIM services backed by best practices.
Frequently Asked Questions
What LOD is suitable for Scan to BIM?
The level of Detail (LOD) depends on the specific project’s needs. A LOD 300 model can work for basic documentation of geometries and systems, and planning whereas LOD 400-500 contains much more detailed information, which would be required for higher scopes. Hence, always ensure that LOD translates from the scope of the project.
How long does a Point Cloud to BIM project take?
In short, it varies. A small building may take 1–2 days to scan and 1–2 weeks to model. Larger or more complex projects can take several weeks. The timeline depends on building size, required LOD, and team expertise.
Can Scan to BIM be done remotely?
Partially. While the scanning needs to be done on-site, everything else, from processing raw data to modeling BIM models can be done remotely. With collaboration tools in BIM, teams across disciplines can work together seamlessly across locations.